CephV10.2.1: Universal Modules 本章介绍Ceph源码中的一些复杂且通用的数据结构 。
Object 在Ceph中,Object通常默认是$4MB$大小的数据块,而一个对象就对应了本地文件系统中的一个文件 。在具体的代码中,Object有很多不同的类型。
object object_t 对应本地文件系统中的一个文件,其中字段名$name$就是对象名。
1
2
3
4
5
6
7
8
9
10
11
12
13
14
15
16
17
18
19
20
struct object_t { string name; object_t () {} object_t (const char *s) : name (s) {} object_t (const string& s) : name (s) {} void swap (object_t & o) name.swap (o.name); } void clear () name.clear (); } void encode (bufferlist &bl) const void decode (bufferlist::iterator &bl) }; WRITE_CLASS_ENCODER (object_t )
其中,$object_t$提供了最主要的构造方法以及encode和decode两个主要方法,同时根据WRITE_CLASS_ENCODER宏,实现了encode和decode的外部调用。
当然,$object_t$也重载了比较运算符和输出,这样能够方便的进行比较和打印。
sobject_t sobject_t 在$object_t$之上增加了$snapshot$信息,用于标识其是否是快照对象 。
在正式介绍$sobject_t$之前,我们应该先了解一下snapid_t 类型。
1
2
3
4
5
6
7
8
9
10
11
12
13
14
15
16
17
18
19
20
21
22
23
24
struct snapid_t { uint64_t val; snapid_t (uint64_t v=0 ) : val (v) {} snapid_t operator +=(snapid_t o) { val += o.val; return *this ; } snapid_t operator ++() { ++val; return *this ; } operator uint64_t () const return val; } }; inline void encode (snapid_t i, bufferlist &bl) encode (i.val, bl); }inline void decode (snapid_t &i, bufferlist::iterator &p) decode (i.val, p); }#define CEPH_SNAPDIR ((__u64)(-1)) #define CEPH_NOSNAP ((__u64)(-2)) #define CEPH_MAXSNAP ((__u64)(-3)) inline ostream& operator <<(ostream& out, snapid_t s) { if (s == CEPH_NOSNAP) return out << "head" ; else if (s == CEPH_SNAPDIR) return out << "snapdir" ; else return out << hex << s.val << dec; }
可以看见,$snapid_t$实际上就是对一个uint64_t变量的封装,我们主要关注最后重载的输出:
CEPH_SNAPDIR标识快照目录(一个隐藏的.snap目录),用于存放快照CEPH_NOSNAP表示没有快照,即文件或对象的最新版本(被称为$head$或$live\ revision$)否则输出快照ID的十六进制数值
了解完$snapid_t$后,我们现在回过头看$sobject_t$的内容:
1
2
3
4
5
6
7
8
9
10
11
12
13
struct sobject_t { object_t oid; snapid_t snap; sobject_t () : snap (0 ) {} sobject_t (object_t o, snapid_t s) : oid (o), snap (s) {} void swap (sobject_t & o) void encode (bufferlist& bl) const void decode (bufferlist::iterator& bl) }; WRITE_CLASS_ENCODER (sobject_t )
$sobject_t$和$object_t$相差无几,只不过多了$snapid_t$信息,需要注意的是,$sobject_t$的encode和decode也需要对snapshot信息进行处理。
如果一个对象不是快照对象(也就是说该对象是$head$),那么这个snap字段就应该被置为CEPH_NOSNAP值 。
hobject_t hobject_t 是 Ceph 中最复杂的对象标识符结构。它不仅包含对象名称和快照信息,还包含哈希值、哈希种子、命名空间、对象在存储池中的位置等。$hobject_t$ 是 Ceph 用来唯一标识和管理对象存储的核心数据结构,它直接用于 Ceph 的 $CRUSH$ 算法来决定对象的物理存储位置 。
1
2
3
4
5
6
7
8
9
10
11
12
13
14
15
16
17
18
struct hobject_t { object_t oid; snapid_t snap; private : uint32_t hash; bool max; uint32_t nibblewise_key_cache; uint32_t hash_reverse_bits; static const int64_t POOL_META = -1 ; static const int64_t POOL_TEMP_START = -2 ; friend class spg_t ; public : int64_t pool; string nspace; private : string key; };
oid
snap
hash
用于定位该对象的哈希值,结合$CRUSH$算法决定对象的存储位置
hash和key不能同时设置,hash值一般设置为$PG$的ID值
max
nibblewise_key_cache
缓存字段,可能用于加速对象定位或哈希计算中的某种优化操作
hash_reverse_bits
存储对象哈希值的反转版本。这可能用于某些哈希算法或排序算法中
pool
表示对象所属的存储池 ID。Ceph 支持多种存储池,每个池可以有不同的冗余和分布策略。该字段用来记录对象属于哪个池
nspace
对象的命名空间(namespace)。命名空间允许在同一个存储池内进一步细分对象,提供更细粒度的管理和隔离
一般为空,用于标识特殊对象
key
在$hobject_t$中,比较主要的函数为:
set_hashmatch_hashbuild_hash_cache_reverse_bits_reverse_nibblescmp_bitwisecmp_nibblewiseparse
在$hobject_t$中,set_hash会根据传入的hash值调用build_hash_cache函数,该函数会通过调用_reverse_nibbles和_reverse_bits分别计算出nibblewise_key_cache和hash_reverse_bits的值:
1
2
3
4
5
6
7
8
9
10
11
12
13
14
15
16
17
18
19
20
21
22
23
static uint32_t _reverse_bits(uint32_t v) { if (v == 0 ) return v; v = ((v >> 1 ) & 0x55555555 ) | ((v & 0x55555555 ) << 1 ); v = ((v >> 2 ) & 0x33333333 ) | ((v & 0x33333333 ) << 2 ); v = ((v >> 4 ) & 0x0F0F0F0F ) | ((v & 0x0F0F0F0F ) << 4 ); v = ((v >> 8 ) & 0x00FF00FF ) | ((v & 0x00FF00FF ) << 8 ); v = ( v >> 16 ) | ( v << 16 ); return v; } static uint32_t _reverse_nibbles(uint32_t retval) { retval = ((retval & 0x0f0f0f0f ) << 4 ) | ((retval & 0xf0f0f0f0 ) >> 4 ); retval = ((retval & 0x00ff00ff ) << 8 ) | ((retval & 0xff00ff00 ) >> 8 ); retval = ((retval & 0x0000ffff ) << 16 ) | ((retval & 0xffff0000 ) >> 16 ); return retval; }
对于_reverse_bits而言,则是将uint32_t的值的执行:
交换奇偶位
交换相邻的两位
交换半字节(nibble)
交换每8位
交换每16位
对于_reverse_nibbles,则是将uint32_t的值执行:
对于match_hash,主要是用于比较指定的最低bits位数的值是否相等:
1
2
3
4
5
6
static bool match_hash (uint32_t to_check, uint32_t bits, uint32_t match) return (match & ~((~0 )<<bits)) == (to_check & ~((~0 )<<bits)); } bool match (uint32_t bits, uint32_t match) const return match_hash (hash, bits, match); }
cmp_nibblewise用于比较两个$hobject_t$对象的max、pool、nibblewise_key、nspace、key、oid和snap的大小关系;而cmp_bitwise只是将nibblewise_key的比较替换为bitwise_key的比较。
然后根据这两个函数分别实现了伪函数用作于比较器:NibblewiseComparator、BitwiseComparator和Comparator。
对于最后的parse函数用于解析字符串形如下面的格式
1 MIN/MAX/pool_id:hash:namespace :key:object_name:snap_id
ghobject_t ghobject_t 是对于$hobject_t$的封装,添加了generation字段和shard_id字段:
1
2
3
4
5
6
struct ghobject_t { hobject_t hobj; gen_t generation; shard_id_t shard_id; bool max; };
$ghobject_t$主要用于$ErasureCode$模式下的$PG$ generation
用于记录对象的版本号。当$PG$为$EC$时,写操作需要区分写前后两个版本的$object$,写操作保存对象的上一个版本的对象,当写失败时,可以$rollback$到上一个版本
shard_id
用于标识对象所在的$OSD$在$EC$类型的$PG$中的序号,对于$EC$来说,每个OSD在$PG$中的序号在数据恢复时非常关键。
如果是$Replicated$类型的$PG$,那么字段就设置为NO_SHARD
在$ghobject_t$中,只有两个函数需要着重注意:make_pgmeta和parse
1
2
3
4
static ghobject_t make_pgmeta (int64_t pool, uint32_t hash, shard_id_t shard) hobject_t h (object_t (), string(), CEPH_NOSNAP, hash, pool, string()) return ghobject_t (h, NO_GEN, shard); }
而该parse用于解析这样的字符串:
1 GHMIN/GHMAX/shard_id#object_id:hash:namespace :key:object_name:snap_id#generation_id
Buffer 在实际的Ceph源码中,Buffer就是一个命名空间,在其内部有很多相关的数据结构;最为基础的则是buffer::raw。
buffer::raw buffer::raw 用于表示和管理一个存储数据的内存块。它包含了数据的管理、复制、校验(CRC)等功能。
1
2
3
4
5
6
7
8
9
class buffer ::raw {public : char *data; unsigned len; atomic_t nref; mutable simple_spinlock_t crc_spinlock; map<pair<size_t , size_t >, pair<uint32_t , uint32_t > > crc_map; };
data
len
nref
crc_spinlock
crc_map
crc校验信息,第一个pair为数据段的起始和结束,第二个pair是crc32校验码:第一个字段为$base\ crc32$校验码,第二个字段为加上数据段后计算出的crc32校验码。
需要注意的是:$buffer::raw$不允许拷贝 。
$buffer::raw$提供了以下函数:
1
2
3
4
5
6
7
8
9
10
11
12
13
14
15
16
17
18
19
20
21
22
23
24
25
26
27
28
29
30
31
32
33
34
35
36
37
38
39
40
41
42
virtual char *get_data () return data; } virtual raw* clone_empty () 0 ;raw *clone () { raw *c = clone_empty (); memcpy (c->data, data, len); return c; } virtual bool can_zero_copy () const virtual int zero_copy_to_fd (int fd, loff_t *offset) virtual bool is_page_aligned () bool is_n_page_sized () virtual bool is_shareable () bool get_crc (const pair<size_t , size_t > &fromto, pair<uint32_t , uint32_t > *crc) const simple_spin_lock (&crc_spinlock); map<pair<size_t , size_t >, pair<uint32_t , uint32_t > >::const_iterator i = crc_map.find (fromto); if (i == crc_map.end ()) { simple_spin_unlock (&crc_spinlock); return false ; } *crc = i->second; simple_spin_unlock (&crc_spinlock); return true ; } void set_crc (const pair<size_t , size_t > &fromto, const pair<uint32_t , uint32_t > &crc) simple_spin_lock (&crc_spinlock); crc_map[fromto] = crc; simple_spin_unlock (&crc_spinlock); } void invalidate_crc () simple_spin_lock (&crc_spinlock); if (crc_map.size () != 0 ) { crc_map.clear (); } simple_spin_unlock (&crc_spinlock); }
raw_malloc raw_malloc 是对$buffer::raw$申请缓存的封装,实际上由$buffer::raw$和三个全局变量控制。
1
2
3
4
5
6
static atomic_t buffer_total_alloc;static atomic64_t buffer_history_alloc_bytes;static atomic64_t buffer_history_alloc_num;const bool buffer_track_alloc = get_env_bool ("CEPH_BUFFER_TRACK" );class buffer ::raw_malloc : public buffer::raw {};
buffer::raw_combined buffer::raw_combined 用于在单个内存分配中同时存放数据缓冲区;其设计目的是将数据和元数据一同进行内存管理,优化内存分配和访问性能 。
1
2
3
class buffer ::raw_combined : public buffer::raw { size_t alignment; };
在某些平台上,为了提高性能或满足硬件需求,数据需要按照特定字节进行对齐。
在这个结构中,最主要的函数为create:
1
2
3
4
5
6
7
8
9
10
11
12
13
14
15
16
17
18
19
20
21
22
static raw_combined *create (unsigned len, unsigned align=0 ) if (!align) align = sizeof (size_t ); size_t rawlen = ROUND_UP_TO (sizeof (buffer::raw_combined), alignof (buffer::raw_combined)); size_t datalen = ROUND_UP_TO (len, alignof (buffer::raw_combined)); #ifdef DARWIN char *ptr = (char *) valloc (rawlen + datalen); #else char *ptr = 0 ; int r = ::posix_memalign ((void **)(void *)&ptr, align, rawlen + datalen); if (r) throw bad_alloc (); #endif if (!ptr) throw bad_alloc (); return new (ptr + datalen) raw_combined (ptr, len, align); }
如果没有指定对其字节,那么我们使用sizeof(size_t)作为默认对齐大小。然后通过ROUND_UP_TO计算出需要申请空间对齐后的大小和该数据结构元数据的大小,然后申请出对应的内存空间($rawlen+datalen$),然后通过定位$new$,将数据结构元数据放置在缓冲区的最后。
buffer::raw_mmap_pages buffer::raw_mmap_pages 通过实现mmap来把内存匿名映射到进程的地址空间,用于专门处理内存映射的页面。
1 data = (char *)::mmap (NULL , len, PROT_READ|PROT_WRITE, MAP_PRIVATE|MAP_ANON, -1 , 0 );
其主要核心代码就上面这一行,调用mmap接口,设置其权限为可读可写、私有且匿名的映射。
buffer::raw_posix_aligned buffer::raw_posix_aligned 通过调用posix_memalign来申请内存地址对齐的内存空间。
其核心代码为:
1
2
3
align = _align; assert ((align >= sizeof (void *)) && (align & (align - 1 )) == 0 );::posix_memalign ((void **)(void *)&data, align, len);
buffer::raw_pipe buffer::raw_pipe 使用管道机制来实现内存缓冲区。
这里需要注意的便是如何初始化管道以及复制管道:
1
2
3
4
5
6
7
8
9
10
11
12
13
14
15
16
17
18
19
20
21
22
23
24
25
26
27
28
29
30
31
32
33
34
35
explicit raw_pipe (unsigned len) : raw(len), source_consumed(false) { size_t max = get_max_pipe_size (); if (len > max) { bdout << "raw_pipe: requested length " << len << " > max length " << max << bendl; throw malformed_input ("length larger than max pipe size" ); } pipefds[0 ] = -1 ; pipefds[1 ] = -1 ; int r; if (::pipe (pipefds) == -1 ) { r = -errno; bdout << "raw_pipe: error creating pipe: " << cpp_strerror (r) << bendl; throw error_code (r); } r = set_nonblocking (pipefds); if (r < 0 ) { bdout << "raw_pipe: error setting nonblocking flag on temp pipe: " << cpp_strerror (r) << bendl; throw error_code (r); } r = set_pipe_size (pipefds, len); if (r < 0 ) { bdout << "raw_pipe: could not set pipe size" << bendl; } inc_total_alloc (len); inc_history_alloc (len); bdout << "raw_pipe " << this << " alloc " << len << " " << buffer::get_total_alloc () << bendl; }
在最开始,我们需要获取管道的最大容量
1
2
3
4
5
6
7
8
9
10
11
12
13
14
15
16
17
18
19
20
21
22
23
24
25
26
27
28
29
30
31
32
33
static atomic_t buffer_max_pipe_size;int update_max_pipe_size () #ifdef CEPH_HAVE_SETPIPE_SZ char buf[32 ]; int r; std::string err; struct stat stat_result; if (::stat ("/proc/sys/fs/pipe-max-size" , &stat_result) == -1 ) return -errno; r = safe_read_file ("/proc/sys/fs/" , "pipe-max-size" , buf, sizeof (buf) - 1 ); if (r < 0 ) return r; buf[r] = '\0' ; size_t size = strict_strtol (buf, 10 , &err); if (!err.empty ()) return -EIO; buffer_max_pipe_size.set (size); #endif return 0 ; } size_t get_max_pipe_size () #ifdef CEPH_HAVE_SETPIPE_SZ size_t size = buffer_max_pipe_size.read (); if (size) return size; if (update_max_pipe_size () == 0 ) return buffer_max_pipe_size.read (); #endif return 65536 ; }
在Linux中,管道的最大容量是写在/proc/sys/fs/pipe-max-size中的,因此我们只需要读取这个文件并保存其数值到buffer_max_pipe_size中,然后通过get_max_pipe_size返回即可。
然后我们就需要创建管道,并设置管道属性为非阻塞模式,同时尝试设置管道大小。
1
2
3
4
5
6
7
8
9
10
11
12
13
14
15
int set_pipe_size (int *fds, long length) #ifdef CEPH_HAVE_SETPIPE_SZ if (::fcntl (fds[1 ], F_SETPIPE_SZ, length) == -1 ) { int r = -errno; if (r == -EPERM) { update_max_pipe_size (); throw malformed_input ("length larger than new max pipe size" ); } return r; } #endif return 0 ; }
对于复制管道,我们需要做出以下操作:
1
2
3
4
5
6
7
8
9
10
11
12
13
14
15
16
17
18
19
20
21
22
23
24
25
26
27
28
29
30
31
32
33
34
35
36
37
38
39
40
41
42
43
44
45
46
47
48
49
50
51
52
char *copy_pipe (int *fds) int tmpfd[2 ]; int r; assert (!source_consumed); assert (fds[0 ] >= 0 ); if (::pipe (tmpfd) == -1 ) { r = -errno; bdout << "raw_pipe: error creating temp pipe: " << cpp_strerror (r) << bendl; throw error_code (r); } r = set_nonblocking (tmpfd); if (r < 0 ) { bdout << "raw_pipe: error setting nonblocking flag on temp pipe: " << cpp_strerror (r) << bendl; throw error_code (r); } r = set_pipe_size (tmpfd, len); if (r < 0 ) { bdout << "raw_pipe: error setting pipe size on temp pipe: " << cpp_strerror (r) << bendl; } int flags = SPLICE_F_NONBLOCK; if (::tee (fds[0 ], tmpfd[1 ], len, flags) == -1 ) { r = errno; bdout << "raw_pipe: error tee'ing into temp pipe: " << cpp_strerror (r) << bendl; close_pipe (tmpfd); throw error_code (r); } data = (char *)malloc (len); if (!data) { close_pipe (tmpfd); throw bad_alloc (); } r = safe_read (tmpfd[0 ], data, len); if (r < (ssize_t )len) { bdout << "raw_pipe: error reading from temp pipe:" << cpp_strerror (r) << bendl; free (data); data = NULL ; close_pipe (tmpfd); throw error_code (r); } close_pipe (tmpfd); return data; }
我们需要创建一个临时管道,然后将原管道的数据复制到该临时管道中,以便读取数据。同样,我们需要将临时管道设置为非阻塞模式,然后设置管道的大小。
通过tee系统调用,将原管道fds[0]中的内容复制到临时管道的写端tmpfd[1]中,然后再从tmpfd[0]中读取数据。
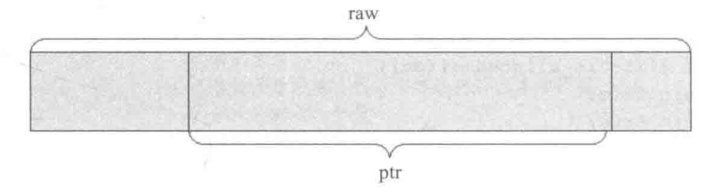
buffer::ptr buffer::ptr 是对$buffer::raw$的一种slice,其具体示意为:
1
2
3
4
class CEPH_BUFFER_API ptr { raw *_raw; unsigned _off, _len; };
_off
该字段是对于$buffer::raw$数据指针的偏移距离
_len
buffer::list buffer::list 是一个使用广泛的类,是多个$buffer::ptr$的列表,也是多个内存数据段的列表。
1
2
3
4
5
6
7
8
9
class CEPH_BUFFER_API list { std::list<ptr> _buffers; unsigned _len; unsigned _memcopy_count; ptr append_buffer; mutable iterator last_p; };
_buffers
_len
_memcopy_count
调用函数rebuild用来内存对齐时,需要内存拷贝的数据量
append_buffer
last_p
该结构体最为主要的便是如何操作list了,因此我们主要探究
push_front/backrebuldappendwrite/read
push_front/back 对于push_front而言,我们只需要调用vector::push_front进行插入即可,如果是$buffer::raw$类型,则通过$buffer:ptr$封装后进行处理。
自然,push_back也是同理。
rebuild rebuild函数主要用于将内部的数据通过对齐的方式重组合并,主要依赖于buffer::raw_posix_aligned ,然后通过$buffer::ptr::copy_in$将每一个数据拷贝进去
1
2
3
4
5
6
7
8
9
10
for (std::list<ptr>::iterator it = _buffers.begin (); it != _buffers.end (); ++it) { nb.copy_in (pos, it->length (), it->c_str (), false ); pos += it->length (); } _memcopy_count += pos; _buffers.clear (); if (nb.length ()) _buffers.push_back (nb); invalidate_crc ();last_p = begin ();
rebuild还有另一个版本rebuild_aligned_size_and_memory
1
2
3
4
5
6
7
8
9
10
11
12
13
14
15
16
17
18
19
20
21
22
23
24
25
26
27
28
29
30
31
32
33
34
35
36
37
38
39
40
41
void buffer::list::rebuild_aligned_size_and_memory (unsigned align_size, unsigned align_memory) { std::list<ptr>::iterator p = _buffers.begin (); while (p != _buffers.end ()) { if (p->is_aligned (align_memory) && p->is_n_align_sized (align_size)) { ++p; continue ; } list unaligned; unsigned offset = 0 ; do { offset += p->length (); unaligned.push_back (*p); _buffers.erase (p++); } while (p != _buffers.end () && (!p->is_aligned (align_memory) || !p->is_n_align_sized (align_size) || (offset % align_size))); if (!(unaligned.is_contiguous () && unaligned._buffers.front ().is_aligned (align_memory))) { ptr nb (buffer::create_aligned(unaligned._len, align_memory)) ; unaligned.rebuild (nb); _memcopy_count += unaligned._len; } _buffers.insert (p, unaligned._buffers.front ()); } last_p = begin (); }
首先我们需要检查数据块是否已经对齐
内存上是否对齐is_aligned
大小上是否对齐is_n_align_sized
如果其中一个数据块未对齐,则需要合并未对齐的数据块,使用unaligned列表存储
检查合并后的数据块是否满足对齐要求,如果不满足,则需要创建新的对齐缓冲区
将对齐后的数据块插回原列表
更新迭代器指针位置
append append归根结底是在内部调用了push_back接口,append有多种重载,允许多种类型的参数传入,此处不再做过多介绍。最为重要的是,我们需要检查append_buffer是否有足够的空间。
1 unsigned gap = append_buffer.unused_tail_length ();
write/read 在$buffer::list$中,write主要有三种方式写:写入流、写入文件、写入fd;而read有两种方式:读取文件、读取fd。
其余方法没有特别需要说明的,就是正常读写操作,但在write_fd中,使用了$iovec$。
$iovec$ 是用于描述输入/输出操作中数据缓冲区的结构体,常用于执行分散/聚集 I/O(scatter/gather I/O)操作 。在 I/O 操作中,它允许应用程序使用多个缓冲区作为输入或输出,避免了将数据拷贝到单一的连续缓冲区 。$iovec$ 结构通常用于 Linux 系统调用。
1
2
3
4
struct iovec { void *iov_base; size_t iov_len; };
通过readv和writev实现分散度和聚集写操作。
1
2
3
4
5
6
7
8
9
10
11
12
13
14
15
16
17
18
19
20
21
22
23
24
25
26
27
28
29
30
31
32
33
34
35
36
37
38
39
40
41
42
43
44
45
iovec iov[IOV_MAX]; int iovlen = 0 ;ssize_t bytes = 0 ;std::list<ptr>::const_iterator p = _buffers.begin (); while (p != _buffers.end ()) { if (p->length () > 0 ) { iov[iovlen].iov_base = (void *)p->c_str (); iov[iovlen].iov_len = p->length (); bytes += p->length (); iovlen++; } ++p; if (iovlen == IOV_MAX-1 || p == _buffers.end ()) { iovec *start = iov; int num = iovlen; ssize_t wrote; retry: wrote = ::writev (fd, start, num); if (wrote < 0 ) { int err = errno; if (err == EINTR) goto retry; return -err; } if (wrote < bytes) { while ((size_t )wrote >= start[0 ].iov_len) { wrote -= start[0 ].iov_len; bytes -= start[0 ].iov_len; start++; num--; } if (wrote > 0 ) { start[0 ].iov_len -= wrote; start[0 ].iov_base = (char *)start[0 ].iov_base + wrote; bytes -= wrote; } goto retry; } iovlen = 0 ; bytes = 0 ; } }
ThreadPool ThreadPool 在Ceph中随处可见且极为重要,在介绍$ThreadPool$之前,我们需要了解一些预备知识。
Mutex Mutex 是Ceph自行实现的互斥锁:
1
2
3
4
5
6
7
8
9
10
11
12
13
14
class Mutex {private : std::string name; int id; bool recursive; bool lockdep; bool backtrace; pthread_mutex_t _m; int nlock; pthread_t locked_by; CephContext *cct; PerfCounters *logger; };
注意:$Mutex$不允许拷贝 。
初始化锁过程 $Mutex$默认不允许递归锁,且开启依赖检测,不允许收集调用栈
1 2 3 4 5 Mutex::Mutex (const std::string &n, bool r, bool ld, bool bt, CephContext *cct) : name (n), id (-1 ), recursive (r), lockdep (ld), backtrace (bt), nlock (0 ), locked_by (0 ), cct (cct), logger (0 ) {}
由于Ceph是由$Valgrind$所监控的,因此我们首先需要告知$Valgrind$,我们的一些变量在多线程中的数据竞争是预期之中且安全的
1
2
3
ANNOTATE_BENIGN_RACE_SIZED (&id, sizeof (id), "Mutex lockdep id" );ANNOTATE_BENIGN_RACE_SIZED (&nlock, sizeof (nlock), "Mutex nlock" );ANNOTATE_BENIGN_RACE_SIZED (&locked_by, sizeof (locked_by), "Mutex locked_by" );
此时我们暂时不对$CephContext$进行分析,看向下一个,如果我们开启了recursive功能,那么我们需要初始化一个递归类型的pthread_mutex_t,因此:
1
2
3
4
5
6
7
8
9
if (recursive) { pthread_mutexattr_t attr; pthread_mutexattr_init (&attr); pthread_mutexattr_settype (&attr, PTHREAD_MUTEX_RECURSIVE); pthread_mutex_init (&_m,&attr); pthread_mutexattr_destroy (&attr); if (lockdep && g_lockdep) _register(); }
这样就允许了同一线程能够被多次锁定,但必须以相同次数解锁。如果锁不是递归锁,但启用了lockdep,则初始化一个带有错误检查的pthread_mutex_t,这种类型的锁会在尝试二次锁定或解锁未锁定的情况下返回错误,从而不会导致死锁或未定义行为
1
2
3
4
5
6
7
8
9
else if (lockdep) { pthread_mutexattr_t attr; pthread_mutexattr_init (&attr); pthread_mutexattr_settype (&attr, PTHREAD_MUTEX_ERRORCHECK); pthread_mutex_init (&_m, &attr); pthread_mutexattr_destroy (&attr); if (g_lockdep) _register(); }
那么现在我们来探究lockdep需要通过_register注册锁依赖信息:
1
2
3
void _register() { id = lockdep_register (name.c_str ()); }
首先,该lockdep_register接受锁的名字,最终会返回一个线程的唯一标识符。在执行具体操作之前,我们需要放置并发访问导致共享数据的竞态,使用一个额外的锁来处理这部分逻辑
1
2
3
4
5
6
7
# define PTHREAD_MUTEX_INITIALIZER \ { { 0, 0, 0, 0, 0, __PTHREAD_SPINS, { 0, 0 } } } static pthread_mutex_t lockdep_mutex = PTHREAD_MUTEX_INITIALIZER;int lockdep_register (const char *name) int id; pthread_mutex_lock (&lockdep_mutex);
通过PTHREAD_MUTEX_INITIALIZER来初始化一个锁,比调用接口初始化更为高效。
当加上锁后,我们需要检查传入的锁名是否已经在哈希表中存在,该哈希表是维护在全局中的变量
1
2
3
static ceph::unordered_map<std::string, int > lock_ids;ceph::unordered_map<std::string, int >::iterator p = lock_ids.find (name); id = p->second;
如果在哈希表中存在,那么就找到了该锁的唯一标识符;如果没有找到,那么会通过free_ids分配一个唯一标识符,free_ids是一个从$0 \sim MAX_LOCKS$的列表
1
2
3
4
5
6
7
8
9
10
11
12
13
14
15
16
if (p == lock_ids.end ()) { if (free_ids.empty ()) { lockdep_dout (0 ) << "ERROR OUT OF IDS .. have " << free_ids.size () << " max " << MAX_LOCKS << dendl; for (auto & p : lock_names) { lockdep_dout (0 ) << " lock " << p.first << " " << p.second << dendl; } assert (free_ids.empty ()); } id = free_ids.front (); free_ids.pop_front (); lock_ids[name] = id; lock_names[id] = name; lockdep_dout (10 ) << "registered '" << name << "' as " << id << dendl; }
最后通过lock_refs维护一个引用计数,来表明一个锁注册了多少次
1
2
3
4
5
static map<int , int > lock_refs;++lock_refs[id]; pthread_mutex_unlock (&lockdep_mutex);return id;
销毁锁过程 显然的,我们在一开始需要对$Valgrind$进行声明,标识对_m的操作不会导致锁的竞态。
1 2 3 4 5 6 7 8 9 10 11 12 13 14 15 Mutex::~Mutex () { assert (nlock == 0 ); ANNOTATE_BENIGN_RACE_SIZED (&_m, sizeof (_m), "Mutex primitive" ); pthread_mutex_destroy (&_m); if (cct && logger) { cct->get_perfcounters_collection ()->remove (logger); delete logger; } if (lockdep && g_lockdep) { lockdep_unregister (id); } }
如果我们在一开始启用了lockdep,那么在最后销毁时,需要将注册的依赖全部注销掉
1
2
3
4
5
6
7
8
9
10
11
12
13
14
15
16
17
18
19
20
21
22
23
24
25
void lockdep_unregister (int id) if (id < 0 ) { return ; } pthread_mutex_lock (&lockdep_mutex); map<int , std::string>::iterator p = lock_names.find (id); assert (p != lock_names.end ()); int &refs = lock_refs[id]; if (--refs == 0 ) { lockdep_dout (10 ) << "unregistered '" << p->second << "' from " << id << dendl; lock_ids.erase (p->second); lock_names.erase (id); lock_refs.erase (id); free_ids.push_back (id); } else { lockdep_dout (20 ) << "have " << refs << " of '" << p->second << "' " << "from " << id << dendl; } pthread_mutex_unlock (&lockdep_mutex); }
中间有一部分是对$BackTrace$的清空,我们此处并不深究这一块,因此没有体现这一部分。
我们最主要做的事情便是,如果该锁的引用计数为0后,在lock_ids哈希表中删除该键值对,然后删除lock_names和lock_refs中的记录,同时将空闲的锁唯一标识符追加到free_ids中。
上锁过程 在这里,我们依旧不讨论$CephContext$的情况。Lock函数接受一个no_lockdep参数,如果在开启lockdep的情况下,$no_lockdep=false$就会触发_will_lock
1
2
void Mutex::Lock (bool no_lockdep) if (lockdep && g_lockdep && !no_lockdep) _will_lock();
_will_lock 函数的意义是配合锁依赖追踪机制,提前告知系统某个锁即将被获取,从而帮助 Ceph 进行锁依赖关系的管理和检测。
1
2
3
void _will_lock() { id = lockdep_will_lock (name.c_str (), id, backtrace); }
该函数会将锁的名字和锁的ID传递给 lockdep_will_lock 函数。lockdep_will_lock 函数会在内部登记或更新该锁的依赖信息,表示该锁即将被某个线程尝试获取。如果启用了回溯$backtrace = true$,Ceph 还会记录锁被获取时的调用栈信息,方便后续的调试和分析。
lockdep_will_lock会在最开始获取线程TID,以及检查传入的锁ID是否有效,如果无效,则通过lockdep_register注册一个有效的锁ID
1
2
3
int lockdep_will_lock (const char *name, int id, bool force_backtrace) pthread_t p = pthread_self (); if (id < 0 ) id = lockdep_register (name);
确认ID有效后,我们从维护的held表中,获取对应的依赖图,然后检查依赖
1 2 3 4 5 6 7 8 9 10 11 12 13 14 15 16 map<int , BackTrace *> &m = held[p]; for (map<int , BackTrace *>::iterator p = m.begin (); p != m.end (); ++p) { if (p->first == id) { lockdep_dout (0 ) << "\n" ; *_dout << "recursive lock of " << name << " (" << id << ")\n" ; BackTrace *bt = new BackTrace (BACKTRACE_SKIP); bt->print (*_dout); if (p->second) { *_dout << "\npreviously locked at\n" ; p->second->print (*_dout); } delete bt; *_dout << dendl; assert (0 ); } }
如果p->first == id就说明发生了递归加锁,此时$BackTrace$会打印出当前发生递归的锁名和对应的锁ID,然后判断该锁之前是否有其他锁,如果有,则打印出其调用栈;如果没有发生递归锁,则需要建立新的依赖关系
1 else if (!follows[p->first][id]) {}
创建依赖关系时,我们需要判断是否会发生循环,followers[a][b]表示b会发生在a之后
1
2
3
4
5
6
7
8
9
10
11
12
13
14
15
16
17
18
19
20
21
22
23
24
25
if (does_follow (id, p->first)) { BackTrace *bt = new BackTrace (BACKTRACE_SKIP); lockdep_dout (0 ) << "new dependency " << lock_names[p->first] << " (" << p->first << ") -> " << name << " (" << id << ")" << " creates a cycle at\n" ; bt->print (*_dout); *_dout << dendl; lockdep_dout (0 ) << "btw, i am holding these locks:" << dendl; for (map<int , BackTrace *>::iterator q = m.begin (); q != m.end (); ++q) { lockdep_dout (0 ) << " " << lock_names[q->first] << " (" << q->first << ")" << dendl; if (q->second) { lockdep_dout (0 ) << " " ; q->second->print (*_dout); *_dout << dendl; } } lockdep_dout (0 ) << "\n" << dendl; assert (0 ); }
因为我们一开始判断的是!follower[p->first][id],也就意味着p->first在id锁之前发生,而dose_follow(id, p->first)为True又表示了id在p->first锁之前发生;这样就发生了一个循环依赖,所以最终会导致死锁。
一旦上面的依赖检查无误,我们就可以正确的加入依赖关系,并且表明id是能够被上锁的。
1
2
3
4
5
6
7
8
9
10
11
else { BackTrace *bt = NULL ; if (force_backtrace || lockdep_force_backtrace ()) { bt = new BackTrace (BACKTRACE_SKIP); } follows[p->first][id] = true ; follows_bt[p->first][id] = bt; lockdep_dout (10 ) << lock_names[p->first] << " -> " << name << " at" << dendl; } return id;
现在我们回到Lock函数中,如果_will_lock没有触发$BackTrace$就说明该id是可以正确上锁的,因此我们就可以调用上锁API
1
2
r = pthread_mutex_lock (&_m); assert (r == 0 );
如果我们开启了lockdep功能,那么在成功上锁后,还需要进行_locked操作检查,记录锁的状态和相关的调试信息
1
2
3
4
5
if (lockdep && g_lockdep) _locked();void _locked() { id = lockdep_locked (name.c_str (), id, backtrace); }
主要的核心操作在于更新held哈希表状态,如果启用了$backtrace$机制,则保存下$BackTrace$
1
2
3
4
if (force_backtrace || lockdep_force_backtrace ()) held[p][id] = new BackTrace (BACKTRACE_SKIP); else held[p][id] = 0 ;
更新完锁的状态后,还需要调用_post_lock对锁的持有者进行更新
1
2
3
4
5
6
7
void _post_lock() { if (!recursive) { assert (nlock == 0 ); locked_by = pthread_self (); }; nlock++; }
这里需要注意,如果没有启用recursive,会对nlock进行断言,表示不允许获取已经持有的锁。
解锁过程 解锁相对于上锁而言,简单了不少,我们需要对锁的状态进行更改,然后判断是否能够解锁后,进行解锁即可
1
2
3
4
5
6
void Mutex::Unlock () _pre_unlock(); if (lockdep && g_lockdep) _will_unlock(); int r = pthread_mutex_unlock (&_m); assert (r == 0 ); }
_pre_unlock会确认引用计数,如果没有启用recursive还会释放其持有者
1
2
3
4
5
6
7
8
9
void _pre_unlock() { assert (nlock > 0 ); --nlock; if (!recursive) { assert (locked_by == pthread_self ()); locked_by = 0 ; assert (nlock == 0 ); } }
已经准备完解锁后,如果启用了lockdep则需要判断依赖条件是否能够解锁
1
2
3
void _will_unlock() { id = lockdep_will_unlock (name.c_str (), id); }
直接删除掉held哈希表中的记录即可
1
2
delete held[p][id];held[p].erase (id);
Locker Locker 是对$Mutex$的封装,可以通过$Locker$直接调用Lock和UnLock
Cond Cond 用于线程同步的封装,主要基于 POSIX 的 pthread_cond_t 条件变量来实现。条件变量用于在多线程编程中协调线程之间的执行顺序,与$Mutex$配合使用
1
2
3
4
5
class Cond { pthread_cond_t _c; Mutex *waiter_mutex; };
_c
封装pthread_cond_t,用于线程之间的等待和信号传递
waiter_mutex
指向当前等待该条件变量的$Mutex$,确保一个条件变量只能与一个互斥锁绑定
对于$Cond$的初始化和销毁操作没有特别需要说明的,当然,$Cond$仍旧不允许拷贝 。
在进入等待时释放锁,被唤醒后重新持有锁,这样可以保证对共享资源的修改是线程安全的 。这也是我们需要遵循的设计原理。
Wait Wait 在$Cond$中有多个重载,但最终的操作都是由这样的代码进行处理的
1
2
3
4
5
6
7
8
9
10
11
12
int Wait (Mutex &mutex) assert (waiter_mutex == NULL || waiter_mutex == &mutex); waiter_mutex = &mutex; assert (mutex.is_locked ()); mutex._pre_unlock(); int r = pthread_cond_wait (&_c, &mutex._m); mutex._post_lock(); return r; }
在调用pthread_cond_wait前,我们需要保证$Mutex$是未上锁状态,因此需要使用_pre_lock来保证$Mutex$维护的信息是表示解锁状态的:
因为一旦pthread_cond_wait进入wait状态,其会自动解锁;pthread_cond_wait被唤醒后,会重新获取锁,因此我们要恢复之前$Mutex$维护的信息,表示其是上锁的 。
Signal 对于$Signal$,通过调用pthread_cond_broadcast和pthread_cond_signal可以选择唤醒所有等待线程,还是一个等待线程。
ThreadPool Structure 现在我们回到$ThreadPool$的代码上
1
2
3
4
5
6
7
8
9
10
11
12
13
14
15
16
17
18
19
20
21
22
class ThreadPool : public md_config_obs_t { CephContext *cct; string name; string thread_name; string lockname; Mutex _lock; Cond _cond; bool _stop; int _pause; int _draining; Cond _wait_cond; int ioprio_class, ioprio_priority; unsigned int _num_threads; string _thread_num_option; const char ** _conf_keys; vector<WorkQueue_*> work_queues; int last_work_queue; set<WorkThread*> _threads; list<WorkThread*> _old_threads; int processing; };
name
lockname
_lock
_cond
_stop
_pause
_draining
_wait_cond
ioprio_class, ioprio_priority
ioprio_class 表示 I/O 优先级类别,比如实时优先级($IOPRIO_CLASS_RT$)、标准优先级($IOPRIO_CLASS_BE$)或空闲优先级($IOPRIO_CLASS_IDLE$)
ioprio_priority 则是具体的优先级值,通常是一个整数,值越小优先级越高
_num_threads
表示线程池中线程的数量。这个值决定了线程池启动时会创建多少个工作线程。线程池的大小可以动态调整,也可以通过配置文件或参数设置。
_thread_num_option
_conf_keys
指向配置键的数组,可能用于监听或监控与线程池相关的配置更改
work_queues
任务队列的集合,每个任务队列($WorkQueue_$)通常代表一组待处理的工作项。$ThreadPool$通过这些任务队列来分发任务给线程。
last_work_queue
记录上一次被调度的任务队列索引。通常线程池在处理多个任务队列时,会轮询这些队列来选择下一个需要处理的队列
_threads
_old_threads
旧线程的列表,可能用于管理即将退出或已经停止的线程
processing
TPHandle ThreadPoolHandle 主要用于监控和管理线程池的超时、心跳机制等功能。通过与 ThreadPool 的交互来控制线程池的超时行为,并防止线程池中的线程长时间无响应。
1
2
3
4
5
6
7
8
class TPHandle { friend class ThreadPool ; CephContext *cct; heartbeat_handle_d *hb; time_t grace; time_t suicide_grace; };
heartbeat_handle_d 首先我们先需要搞懂heartbeat_handle_d这一玩意到底做了些什么,如果我们了解过Raft 的话,就理应知晓心跳机制的作用:
用于保持集群中的Leader和Follower之间的同步状态,并确保集群能够在一致的状态下正常运行 。
1
2
3
4
5
6
7
8
9
10
struct heartbeat_handle_d { const std::string name; atomic_t timeout, suicide_timeout; time_t grace, suicide_grace; std::list<heartbeat_handle_d*>::iterator list_item; explicit heartbeat_handle_d (const std::string& n) : name(n), grace(0 ), suicide_grace(0 ) { }};
从heartbeat_handle_d的结构上看,其主要是管理了一个可维护的时间序列。
timeout表示常规的心跳超时。在超时时间内,组件或线程必须发送心跳信号,否则系统将视其为不可用;而grace表示宽限期。宽限期是允许组件或线程在不发送心跳信号的情况下,继续运行的一段时间。在 grace 期内,即使没有收到心跳信号,系统不会立即判定线程失效。它是一种缓冲机制,防止短暂的延迟或网络波动导致不必要的超时。
一旦超时后,如果组件或线程在suicide_timeout时间内仍未发送心跳信号,系统可能会采取更严重的措施,如强制结束线程或将其标记为失败。suicide_grace 是类似于 grace 的宽限期,但它与suicide相关联
现在,我们回到$TPHandle$的实现中,这里主要给出了两个函数用于处理心跳机制:reset_tp_timeout和suspend_tp_timeout
reset_tp_timeout的内部由$CephContext$调用reset_timeout()实现,因为$CephContext$会管理全局心跳信息,因此应该从全局上修改;该函数用于重置心跳超时时间,并且设置新的宽恕时间 (如果有的话):
1 cct->get_heartbeat_map ()->reset_timeout (hb, grace, suicide_grace);
当然,suspend_tp_timeout也是由$CephContext$调用clear_timeout()实现;其作用是清空超时时间和宽恕时间
1 cct->get_heartbeat_map ()->clear_timeout (hb);
WorkQueue_ WorkQueue_ 是 Ceph 中一个工作队列的基本接口,供工作线程使用。工作队列在 Ceph 这样的分布式系统中,通常用来管理需要处理的任务。该接口定义了与队列管理、任务处理相关的核心操作和抽象方法,具体实现将由继承该接口的类来完成。
其中,timeout_interval表示工作队列中的任务超时时间。每个任务在队列中不应停留超过这个时间,如果超时,可能会触发警告或其他恢复机制。suicide_interval表示自杀间隔时间。如果队列长时间处于无响应状态或任务处理过于缓慢,可能会根据这个时间采取终止处理或回收资源的措施。
不论在哪一种$WorkQueue$中,我们只需要记住:
进队时需要加入任务并唤醒一个线程处理 。
BatchWorkQueue BatchWorkQueue 用于处理一批工作项。该类通过泛型模板来灵活适应不同类型的工作项,并提供了批量处理任务的机制
对于$BatchWorkQueue$而言,实际上还是一个基类,主要用于需要进行批处理的Work去实例化。
我们需要注意的函数可能是:
queue和dequeue需要衍生类实现的_enqueue和_dequeue
需要衍生类实现的_process和_process_finish
WorkQueueVal_ WorkQueueVal_ 专门用于处理按值传递的任务。与其他工作队列不同,它通过模板参数来支持值类型(而非指针类型)的任务处理,适合于处理较小的、内存占用较少的任务对象。
在该类型中,多出来两个成员用于管理任务队列:
to_process:任务处理列表,存储待处理的任务。在队列取出任务时,会将其放入 to_process 列表。to_finish:任务完成列表,存储已处理但未完成的任务。任务处理完成后,会被移入此列表,以便进一步的后续处理。
上面类似,其实这也是需要具体实现各种实际操作的,不过在入队出队时,需要根据实际情况填写to_process和to_finish逻辑。
WorkQueue WorkQueue 主要用于处理较大或包含动态分配内存的工作项。
该类适用于需要异步处理大量数据的场景,例如在 Ceph 中处理存储请求的后台任务,能够有效管理动态分配的内存,并确保任务的并发处理 。
PointerWQ PointerWQ 实现了一个按指针提交的工作队列。这个类的设计主要用于处理类型为 T 的工作项,适合于需要动态内存管理的场景。
和上面不同的是,$PointerWQ$多了两个成员用于管理内部任务信息:
m_items: 存储指向工作项的指针的列表,使用双向链表方便在队列头部和尾部进行插入和删除。m_processing: 记录当前正在处理的工作项的数量,保证线程安全。
WorkThread Thread Thread 是Ceph中对于$POSIX$线程的封装。额外提供了优先级处理 。
1
2
3
4
5
6
7
8
class Thread {private : pthread_t thread_id; pid_t pid; int ioprio_class, ioprio_priority; int cpuid; const char *thread_name; };
我们主要需要注意的是Ceph在创建、销毁和设置线程属性时的处理:
对于创建线程,$Thread$特别提供了try_create用于处理创建线程的核心部分:
1
2
3
4
5
6
stacksize &= CEPH_PAGE_MASK; if (stacksize) { thread_attr = &thread_attr_loc; pthread_attr_init (thread_attr); pthread_attr_setstacksize (thread_attr, stacksize); }
我们通过传入的线程栈大小与设置的页掩码比较,确定了传入的参数是合乎规范的,因此设定了线程的栈大小属性。
1
2
3
4
5
6
7
8
sigset_t old_sigset;if (g_code_env == CODE_ENVIRONMENT_LIBRARY) { block_signals (NULL , &old_sigset); } else { int to_block[] = { SIGPIPE , 0 }; block_signals (to_block, &old_sigset); }
在 Ceph 中,许多组件都依赖于多线程来处理请求(如存储请求、数据复制等)。在创建新线程之前阻塞信号,可以确保新线程在执行关键初始化逻辑时不会意外中断,从而维护系统的稳定性 。
允许 Ceph 在不同的部署或运行模式下采取不同的信号处理策略。
1
2
3
4
5
6
r = pthread_create (&thread_id, thread_attr, _entry_func, (void *)this ); restore_sigset (&old_sigset);if (thread_attr) { pthread_attr_destroy (thread_attr); }
当确保Ceph需要新启动的线程不会收到其他线程干扰后,就可以开始启动线程,然后恢复信号状态。如果在之前设置了线程属性,则需要销毁保证资源回收。
我们发现,这里通过回调,使得线程从_entry_func启动,并且将自身传入作为参数:
1
2
3
4
void *Thread::_entry_func(void *arg) { void *r = ((Thread*)arg)->entry_wrapper (); return r; }
在entry_wrapper函数中,会对线程的属性进一步设置,同时调用真正线程应该执行的函数(这一点由衍生类进行实现):
1
2
3
4
5
6
7
8
9
10
11
12
13
14
15
16
17
void *Thread::entry_wrapper () int p = ceph_gettid (); if (p > 0 ) pid = p; if (pid && ioprio_class >= 0 && ioprio_priority >= 0 ) { ceph_ioprio_set (IOPRIO_WHO_PROCESS, pid, IOPRIO_PRIO_VALUE (ioprio_class, ioprio_priority)); } if (pid && cpuid >= 0 ) _set_affinity(cpuid); pthread_setname_np (pthread_self (), thread_name); return entry (); }
ceph_gettid对SYS_gettid进行直接调用,获取当前线程的线程ID,如果存在,那且有优先级设置,我们就需要对优先级进行设置:
1 syscall (SYS_ioprio_set, whence, who, ioprio);
whence指明了是用于线程还是进程who指明用于哪一个目标ioprio则是优先级
设置完完优先级后,我们还需要对CPU进行处理,将特定线程绑定到特定的CPU上,提高资源利用率
1
2
3
4
5
6
7
8
9
cpu_set_t cpuset;CPU_ZERO (&cpuset);CPU_SET (id, &cpuset);if (sched_setaffinity (0 , sizeof (cpuset), &cpuset) < 0 ) return -errno; sched_yield ();
最后,我们开始调用真正的线程需要执行的函数入口entry。
现在我们回到$WorkThread$结构体,该结构主要针对entry进行实现。
1
2
3
4
void *entry () pool->worker (this ); return 0 ; }
在$WorkThread$中,为了方便的共享数据,我们将$ThreadPool$作为指针成员放置在$WorkThread$中,然后通过$ThreadPool$来进行$work$(在后面详细介绍其工作原理)。
Start Thread 到现在为止,我们已经了解了关于$ThreadPool$的所有零碎的片段,现在,应该从$ThreadPool$会做什么事情开始进行分析了。
在$ThreadPool$中会提供一个$start$函数入口作为线程池的启动函数,而该函数会简单的调用$start_thread$
1
2
3
4
WorkThread *wt = new WorkThread (this ); _threads.insert (wt); int r = wt->set_ioprio (ioprio_class, ioprio_priority);wt->create (thread_name.c_str ());
start_thread会通过$WorkThread$创建一个工作线程,然后设置其优先级,并真正的创建一个$POSIX\ Thread$。启动的线程会自动的调用worker函数,对于$ThreadPool$,worker是主要的核心逻辑:
将当前工作线程加入到心跳管理中
检查并处理已经结束的线程,确保线程池中的线程数量在规定范围内
如果当前线程数量超过了最大线程数,则记录并将该线程移交到old_thread中管理
轮询每一个工作队列中的任务
如果正确从工作队列中得到任务,通过$TPHandle$设置心跳时间,进行处理
当所有任务轮询完毕,将该线程的心跳管理移除
Stop Thread stop函数需要做的工作很简单,只需要将自身在observer的监视中移除,然后唤醒所有线程,并处理完休眠的线程还未完成的任务,然后逐一清空即可。
1 2 3 4 cct->_conf->remove_observer (this ); _cond.Signal (); join_old_threads ();